Friday 30 July 2010

Summit Concept Art Part 2

Here's another cool exclusive.  Everybody bask in its awesomness.

At this point we were calling Summit the iD-something-something.  There was going to be a number after the two letters, which hadn't yet been decided on.  We had decided to change up the inputs and outputs a bit at this point.  This was a while before we eventually settled on 16 mic/line, with the ability to pair them up for stereo inputs.

Again, we tried to pack too much into too small a design, and the end result was a bit 'wishy-washy' and not very intuitive.   If you look at the back panel, though, you can see the final design start to take shape.

Click to embiggenize

Thursday 29 July 2010

Summit Concept Art Part 1

I've got a very cool exclusive for anybody reading this blog.  Below you can find a very early concept art for the Summit digital mixer, circa 2008.  This is just one of hundreds of designs that we rejected for obvious aesthetic reasons.  I remember the name that was being thrown around at the time was i72DMC.  I still have absolutely no idea what that was supposed to mean.

Click to embiggen.

Wednesday 28 July 2010

Firmware Updates

Phonic will periodically put firmware updates on their website.  These firmware updates will improve and expand features, as well as tweak any minor bugs that may be present.

Not that they expect any.

To perform a firmware upgrade, all a user needs to do is place the firmware update file on a blank, formated SD card and place that into the Summit's SD card slot.  Go into the Setup menu and select the Update tab.  Click Okay to begin and it should do all the work from there on (within about 2 minutes).

In the event that you accidentally turn the power off or otherwise do not complete the firmware installation, you can restore the unit to the factory default firmware with an appropriate restore file.  This file is available in the software section of dc.phonic.com.  To do so, you just need to put the restore file on an SD card and start the Summit up with the SD card inserted.

Tuesday 27 July 2010

GUI Main Menu

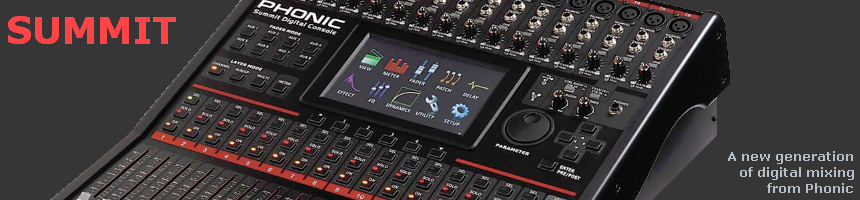
Just thought I'd take a step back a moment and give you a look at the main menu of the Summit.  It's a beauty, isn't it?  After the Summit's loading screens, this is the first menu you'll be given.  The View screen has already been discussed in the previous blog posts, but the rest of these options have their own fantastic options.

The meter offers input and output level meters on every input, every output, and every mix.  This includes your AUX and Group mixes, as well as your EFX signal and your digital inputs and outputs (through AES/EBU).

The fader menu is similar to the View, but very watered down.  By doing so, it allows you to see 4 channels at the same time.  You're given a few basic controls: level, panning, on/off, and main assignment.  There is also a level meter on each channel.

The patch menu simply lets you decide the order that the EQ, dynamic processor and delay options will affect the individual signals.  Each channel can be individually adjusted, so if you want to apply the EQ before the dynamics on channel 1, but the dynamics before EQ on channel 2 - this is no problem!

The delay lets you apply a variable delay (up to 2 seconds) to any of the input or output channels.  The input channels also have a mix and feedback option.  Add a bit of feedback to electric guitars, and you'll be rockin' in no time.

The effect menu obviously lets you apply digital effects. There are 2 processors in total, and they both have the same effects.  Effect 1 also has a bunch of reverb effects that can be applied.

The EQ menu lets you adjust the 4-band EQ for each input and output channel.  This can be done on screen or using the onboard controls (trust me, using the screen is MUCH easier).

Dynamics allows you to adjust your compressor, limiter, gate and expander.  These can all be applied simultaneously to each input and output channel, but can be turned off if you don't need them.  Again, adjust it all on screen if you want, or use the onboard controls.  There's a nice little graph that lets you see the dynamics as they're applied.

Next are the Utility and Setup menus.  As the names suggest, these are a few functions that don't go under any other categories.  These include: signal generator, link and group functions, save/load scene function, screen calibration and firmware updates.

There'll be more about all of these at a later date.

Main and Multi Output View Screen

The MAIN/MULTI tab has a very similar View screen to the input channels.  Here you can activate and deactivate the channels, view meters, adjust levels, add an EQ, a dynamic processor, delay - and so forth.

The only difference is the SOURCE section at the bottom.  On input channels, these are your AUX and GROUP sends, but on the output channels, these allow you to view and change your channel source selection.

Take the imagine above for example.  Here, users are able to assign their channel inputs (from one to 16) to the main mix, just by touching the onscreen icon.  Users can also assign any of the 8 group mixes to the main mix (AUX mixes can only be assigned to the Multi outputs).  All of these "To Main" sends can of course be activated in the channels' own view screens, but having everything available on one screen like this obviously makes all the difference.

In fact, if you wanted to jump straight to this screen, you need only push the select button for the main mix on the mixer itself.  Piece of cake!

Monday 26 July 2010

Control Room Tab and Soloing


Above is the CONTROL ROOM tab on the View menu (first menu item, third tab).  Here you can view the soloing status of your input channels, AUX mixes, group mixes, digital inputs, EFX mixes and your main stereo mix.  These can all be adjusted between AFLs and PFLs - After Fader Listens and Pre Fader Listens.  You touch the onscreen icons to alternate between the two.

As you can see in the above picture, some of the icons have the word "SAFE" written within.  This indicates that the channel's set to SAFE SOLO.  Typically when you solo a signal, it will be cut off from the main mix and sent only to the control room.  Setting a SAFE SOLO will ensure when you solo the signal it will be sent to both the control room and the main mix.  To set a safe solo, you just push the SOLO SAFE button followed by the button of the channel you want to set the solo safe to.

To activate a solo within this menu, you can push the SOLO button, followed by the channel(s) you wish to activate the solo on.  For the AES/EBU or EFX mixes, you simply need to touch the buttons to activate the solo (as there's no PFL/AFL option on these).  A soloed signal is indicated by a red "headphone" icon within the corresponding button.

Also in this menu you have a level meter, a mono/stereo adjustment button and a level control.  Not too shabby!

As anyone who's used almost any mixer will know, the control room mix will be sent to the Control Room outputs on the rear (they're XLR connectors on the Summit) as well as the headphones output on the front of the Summit.

Sunday 25 July 2010

Summit User's Manual

The full user manual (in color) for the Summit can be downloaded in English, Spanish and Chinese (Simplified).


A German version is also available from Phonic's German distributor.

Friday 23 July 2010

AUX and Group Mixes


From the first tab of the View menu (CHANNEL) and onto the second tab: AUX/GROUP.


The above picture shows the AUX 1 channel sends.  You can select the AUX or Group mix you want to view/alter by using the icon on the right hand side of this menu (it currently says AUX 1, but will display whichever mix you've currently selected).

You can't see it in this image, but this whole screen is actually a series of level meters.  On the left-hand side of the image you can see 16 virtual rotary controls (brown indicates their "pre-fader sends").  Above these users can view the level of signal that is currently sent from the corresponding channel to the AUX mix.  The overall level of the AUX mix (pre- or post-fader!) can be viewed on the right-hand side next to the virtual fader.

So what are these virtual rotary controls for?  You can actually adjust the AUX sends to the currently chosen mix by pushing these and spinning the onboard jog wheel.  But if this isn't to your liking, the mixer's hardware also has these buttons:


These adjust the FADER MODE of the Summit (as suggested by the CAPITALIZED name above the buttons).  Push the any of these AUX buttons and you will be able to adjust the AUX sends to the selected mix using the 16 channel faders on the Summit.  Piece of cake.

So, for example, you push AUX 1 in the FADER MODE section.  Your faders will then move into their appropriate positions.  If you have absolutely no channel sends to your AUX 1 mix, the faders will all fall down to the minus infinity point.  You can then push any of these faders up to send that channel to your AUX1 mix.  To return to channel mode, simply push the "channel" button in your LAYER MODE section like so:


AUX and Group mixes can be assigned to the Multi Outputs on the back of the mixer, but we'll talk about that when we get there.

Wednesday 21 July 2010

Shure UK "What's New" Video


Another introductory video featuring Jay Marino.  A little extra information featured here.

Tuesday 20 July 2010

Summit Introduction Video


A Summit introduction video from Jay Marino. Recorded at the 2010 Prolight+Sound Show.

Channel View


Thought I'd just jump right into it.  In the image above you can see the "View" menu of the Summit.  It's the first option on the Summit's main menu.  Here you can access almost every function that a channel provides, all maintained within a single screen.  As this is a touch-screen, you just need to touch the appropriate on-screen icon to active/deactive the function.

Within the CHANNEL tab of the view function users can see and adjust:

On the left:
  • On/Off Status
  • Channel Soloing
  • Selected Channel (CH1-16)
  • Channel Level
  • Assign to Main
  • Invert Phase
  • USB/FireWire Return Status
  • Input/Output Level Meter
  • Pre/Post Metering
Top:
  • EQ On/Off
  • Access EQ Menu
  • Dynamic Processor On/Off
  • Access Dynamics Menu
  • Gate, Expander, Compressor & Limiter On/Off
  • Delay On/Off
  • Delay Time
  • Delay Mix Level
  • Delay Feedback
  • EQ, Dynamic & Delay Processing Order
Bottom:
  • AUX Sends
  • Group Assignment
And that's just the first tab of the first menu on the Summit.